BitmapEffect
Silverlightで記述できないものに、BitmapEffect があります。まず、WPFアプリケーションでどんなものか理解しておきたいと思います。
「XAML,WPF,Silverlight」「Silverlight」に書いたように、SilverlightでもPixel単位の操作は可能なので、必要ならフィルタを書くことが可能だと考えています。
- BlurBitmapEffect
ぼかす効果
- OuterGlowBitmapEffect
オブジェクトの外周をにじませる
- DropShadowBitmapEffect
オブジェクトの背後に影を付ける
- BevelBitmapEffect
べベル効果
- EmbossBitmapEffect
エンボス効果
1.BlurBitmapEffect
「ぼかす」で思いつくのは以下のようなことです。
- ピントが合っていない静止画像
- 半透明な物体を通して見ている
(ガラス、プラスチック、水、霧、霞、スモッグ、硝煙、...)
- ノイズ除去のためのぼかし
KernelType と Radius プロパティで調整するようです。
Radiusは、計算に使う近傍のPixel数を決め、KernelTypeは各Pixelに乗ずる係数の値を決めるものだと思います。
KernelTypeがGaussianで、Radiusが1は、3x3のガウス係数が使われるのだと解釈しました。

KernelTypeがBoxと言うのは、ガウス係数を使う方法の近似法のようです。

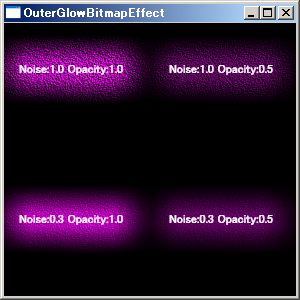
2.OuterGlowBitmapEffect
- <Window x:Class="wpf_OuterGlowBitmapEffect1.Window1"
- xmlns="http://schemas.microsoft.com/winfx/2006/xaml/presentation"
- xmlns:x="http://schemas.microsoft.com/winfx/2006/xaml"
- Title="OuterGlowBitmapEffect" Height="300" Width="300" Background="Black" >
- <Grid>
- <Grid.RowDefinitions>
- <RowDefinition Height="150"></RowDefinition>
- <RowDefinition Height="150"></RowDefinition>
- </Grid.RowDefinitions>
- <Grid.ColumnDefinitions>
- <ColumnDefinition Width="150"></ColumnDefinition>
- <ColumnDefinition Width="150"></ColumnDefinition>
- </Grid.ColumnDefinitions>
- <Canvas Grid.Row="0" Grid.Column="0">
- <TextBlock Canvas.Left="15" Canvas.Top="40" Width="120" Foreground="White" Text="Noise:1.0 Opacity:1.0">
- <TextBlock.BitmapEffect>
- <OuterGlowBitmapEffect GlowSize="30" GlowColor="Magenta" Noise="1" Opacity="1"/>
- </TextBlock.BitmapEffect>
- </TextBlock>
- </Canvas>
- <Canvas Grid.Row="1" Grid.Column="0">
- <TextBlock Canvas.Left="15" Canvas.Top="40" Width="120" Foreground="White" Text="Noise:0.3 Opacity:1.0">
- <TextBlock.BitmapEffect>
- <OuterGlowBitmapEffect GlowSize="30" GlowColor="Magenta" Noise="0.3" Opacity="1"/>
- </TextBlock.BitmapEffect>
- </TextBlock>
- </Canvas>
- <Canvas Grid.Row="0" Grid.Column="1">
- <TextBlock Canvas.Left="15" Canvas.Top="40" Width="120" Foreground="White" Text="Noise:1.0 Opacity:0.5">
- <TextBlock.BitmapEffect>
- <OuterGlowBitmapEffect GlowSize="30" GlowColor="Magenta" Noise="1" Opacity="0.5"/>
- </TextBlock.BitmapEffect>
- </TextBlock>
- </Canvas>
- <Canvas Grid.Row="1" Grid.Column="1">
- <TextBlock Canvas.Left="15" Canvas.Top="40" Width="120" Foreground="White" Text="Noise:0.3 Opacity:0.5">
- <TextBlock.BitmapEffect>
- <OuterGlowBitmapEffect GlowSize="30" GlowColor="Magenta" Noise="0.3" Opacity="0.5"/>
- </TextBlock.BitmapEffect>
- </TextBlock>
- </Canvas>
- </Grid>
- </Window>
Noise、Opacity で効果を制御します。
付加されるノイズは、透明と言うことのようです。
コントロールの外周の外側に効果が付けられるので、StackPanelなどでは GlowSize が考慮されません。GlowSize を考慮してコントロールの位置を指定する必要があります。
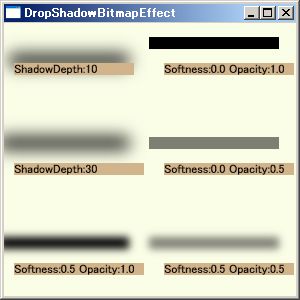
3.DropShadowBitmapEffect
- <Window x:Class="wpf_DropShadowBitmapEffect1.Window1"
- xmlns="http://schemas.microsoft.com/winfx/2006/xaml/presentation"
- xmlns:x="http://schemas.microsoft.com/winfx/2006/xaml"
- Title="DropShadowBitmapEffect" Height="300" Width="300">
- <Grid>
- <Grid.RowDefinitions>
- <RowDefinition Height="100"></RowDefinition>
- <RowDefinition Height="100"></RowDefinition>
- <RowDefinition Height="100"></RowDefinition>
- </Grid.RowDefinitions>
- <Grid.ColumnDefinitions>
- <ColumnDefinition Width="150"></ColumnDefinition>
- <ColumnDefinition Width="150"></ColumnDefinition>
- </Grid.ColumnDefinitions>
- <Canvas Grid.Row="0" Grid.Column="0">
- <TextBlock Canvas.Left="10" Canvas.Top="40" Width="120" Background="Tan" Text="ShadowDepth:10">
- <TextBlock.BitmapEffect>
- <DropShadowBitmapEffect Direction="120" ShadowDepth="10" Softness="1" Opacity="1"/>
- </TextBlock.BitmapEffect>
- </TextBlock>
- </Canvas>
- <Canvas Grid.Row="1" Grid.Column="0">
- <TextBlock Canvas.Left="10" Canvas.Top="40" Width="130" Background="Tan" Text="ShadowDepth:30">
- <TextBlock.BitmapEffect>
- <DropShadowBitmapEffect Direction="120" ShadowDepth="30" Softness="1" Opacity="1"/>
- </TextBlock.BitmapEffect>
- </TextBlock>
- </Canvas>
- <Canvas Grid.Row="3" Grid.Column="0">
- <TextBlock Canvas.Left="10" Canvas.Top="40" Width="130" Background="Tan" Text="Softness:0.5 Opacity:1.0">
- <TextBlock.BitmapEffect>
- <DropShadowBitmapEffect Direction="120" ShadowDepth="30" Softness="0.5" Opacity="1"/>
- </TextBlock.BitmapEffect>
- </TextBlock>
- </Canvas>
- <Canvas Grid.Row="0" Grid.Column="1">
- <TextBlock Canvas.Left="10" Canvas.Top="40" Width="130" Background="Tan" Text="Softness:0.0 Opacity:1.0">
- <TextBlock.BitmapEffect>
- <DropShadowBitmapEffect Direction="120" ShadowDepth="30" Softness="0" Opacity="1"/>
- </TextBlock.BitmapEffect>
- </TextBlock>
- </Canvas>
- <Canvas Grid.Row="1" Grid.Column="1">
- <TextBlock Canvas.Left="10" Canvas.Top="40" Width="130" Background="Tan" Text="Softness:0.0 Opacity:0.5">
- <TextBlock.BitmapEffect>
- <DropShadowBitmapEffect Direction="120" ShadowDepth="30" Softness="0" Opacity="0.5"/>
- </TextBlock.BitmapEffect>
- </TextBlock>
- </Canvas>
- <Canvas Grid.Row="2" Grid.Column="1">
- <TextBlock Canvas.Left="10" Canvas.Top="40" Width="130" Background="Tan" Text="Softness:0.5 Opacity:0.5">
- <TextBlock.BitmapEffect>
- <DropShadowBitmapEffect Direction="120" ShadowDepth="30" Softness="0.5" Opacity="0.5"/>
- </TextBlock.BitmapEffect>
- </TextBlock>
- </Canvas>
- </Grid>
- </Window>
Direction、ShadowDepth、Softness、Opacity で効果を制御します。
コントロールの外側に効果が付けられるので、StackPanelなどでは、効果の表示部分が考慮されません。効果の描画部分を考慮してコントロールの位置を指定する必要があります。
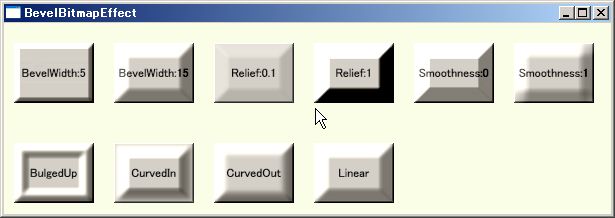
4.BevelBitmapEffect

この効果そのものは良く見かけるもので、ボタンなどのコントロールの内のりに影を描いて立体的に見せます。
しかし、これがいつも良く理解できず、すっきりしません。
1つ目の図は、凸なボタンに見えると思います。
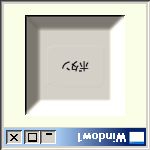
2つ目のボタンは、凹なボタンに見えると思います。
この2つの図は、同じ図形で、上下を逆さにしてあります。
この効果は、主観的な効果で見る方向や周りの状態で見え方が変わるもののようです。
推測では、光が上から来るものとの前提が使われていて、凹凸の認識を左右しているものだろうと思います。
下から光が来ているのだと言い聞かせながら2つ目の図を見ると凸なボタンに見えてきます。
(モニタの表示も表示面を水平にすれば、どちらが上かは、単に認識の問題になる。「上」は何を意味するかも興味深い。)
もう一つの疑問は、反対に、どちらから光が来ているかを図から判断していると言うことです。この場合、明るい暗いをどのように判定しているかです。グレースケールならあまり疑問はないのですが色を使って凹凸を表現できるのでしょうか。
人の目は、明暗を感じる細胞と色を感じる細胞は個別に存在し、明暗を感じる細胞が多いと聞きました。グレースケールだと効果が高いと感じるのですが、凹凸の判断には明暗を感じる細胞の入力が使われてるのではと思います。

この効果は、形状を矩形以外に変えた場合でもそれなりに機能するようです。
ただし、外周から一律に処理されておらず、赤い部分と緑の部分の処理が異なっているように見えます。
BevelBitmapEffect は、BevelWidth、EdgeProfile、Relief、Smoothness、LightAngle プロパティで効果を制御します。
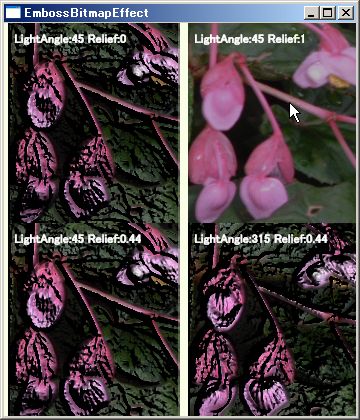
5.EmbossBitmapEffect
- <Window x:Class="wpf_EmbossBitmapEffect1.Window1"
- xmlns="http://schemas.microsoft.com/winfx/2006/xaml/presentation"
- xmlns:x="http://schemas.microsoft.com/winfx/2006/xaml"
- Title="EmbossBitmapEffect" Height="420" Width="360">
- <Window.Resources>
- <BitmapImage x:Key="original" UriSource="eegonia_evansiana2.png"/>
- </Window.Resources>
- <Grid>
- <Grid.RowDefinitions>
- <RowDefinition Height="200"></RowDefinition>
- <RowDefinition Height="200"></RowDefinition>
- </Grid.RowDefinitions>
- <Grid.ColumnDefinitions>
- <ColumnDefinition Width="180"></ColumnDefinition>
- <ColumnDefinition Width="180"></ColumnDefinition>
- </Grid.ColumnDefinitions>
- <Grid Grid.Row="0" Grid.Column="0">
- <Image Source="{StaticResource original}">
- <Image.BitmapEffect>
- <EmbossBitmapEffect LightAngle="45" Relief="0"/>
- </Image.BitmapEffect>
- </Image>
- <TextBlock Margin="10" Foreground="White" FontWeight="Bold">LightAngle:45 Relief:0</TextBlock>
- </Grid>
- <Grid Grid.Row="1" Grid.Column="0">
- <Image Source="{StaticResource original}">
- <Image.BitmapEffect>
- <EmbossBitmapEffect LightAngle="45" Relief="0.44"/>
- </Image.BitmapEffect>
- </Image>
- <TextBlock Margin="10" Foreground="White" FontWeight="Bold">LightAngle:45 Relief:0.44</TextBlock>
- </Grid>
- <Grid Grid.Row="0" Grid.Column="1">
- <Image Source="{StaticResource original}">
- <Image.BitmapEffect>
- <EmbossBitmapEffect LightAngle="45" Relief="1"/>
- </Image.BitmapEffect>
- </Image>
- <TextBlock Margin="10" Foreground="White" FontWeight="Bold">LightAngle:45 Relief:1</TextBlock>
- </Grid>
- <Grid Grid.Row="1" Grid.Column="1">
- <Image Source="{StaticResource original}">
- <Image.BitmapEffect>
- <EmbossBitmapEffect LightAngle="315" Relief="0.44"/>
- </Image.BitmapEffect>
- </Image>
- <TextBlock Margin="10" Foreground="White" FontWeight="Bold">LightAngle:315 Relief:0.44</TextBlock>
- </Grid>
- </Grid>
- </Window>
Relief、LightAngle プロパティで効果を制御します。Reliefの値が小さいほど効果が大きいようです。
|
