WPFのバインディング
1.XAMLで記述したコントロール間でのバインディング
キー入力用の TextBox と表示用の TextBlock の2つのコントロールを配置します。
TextBoxに1文字入力するごとに、TextBlockにも同じ内容が表示されます。
- <TextBox Name="textBox1" Grid.Column="0" Grid.Row="0" />
- <TextBlock Grid.Column="1" Grid.Row="0">
- <TextBlock.Text>
- <Binding ElementName="textBox1" Path="Text"/>
- </TextBlock.Text>
- </TextBlock>
2.キー入力をプログラムの変数に反映する
INotifyPropertyChanged インタフェースを継承した変数用のクラスを使います。
これは、双方向に使えます。
次の例を参照ください。
確認できたのは、TextBox に値を入力しても、変数は書き換えられません。
TextBoxに対する操作ではなく、Buttonがクリックされるなど、アプリケーションに制御が渡るときに、変数が更新されます。
3.プログラムの変数を変えると表示が変わる
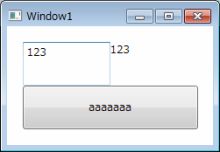 このサンプルは、TextBox、TextBlock、Buttonの3つのコントロールを配置してあります。 このサンプルは、TextBox、TextBlock、Buttonの3つのコントロールを配置してあります。
TextBlockのTextプロパティは、TextBoxのTextプロパティにバインドしてあります。
TextBoxに文字を入力するごとに、TextBlockにも同様に表示されます。
この動作は、XAMLの記述だけで実現されています。
1.で説明したものです。
プログラムの変数との連携には、変数を含むクラスが INotifyPropertyChanged インタフェースを持つことが必要です。
XAML
- <Window x:Class="WpfApplication2.Window1"
- xmlns="http://schemas.microsoft.com/winfx/2006/xaml/presentation"
- xmlns:x="http://schemas.microsoft.com/winfx/2006/xaml"
- Title="Window1" Height="300" Width="300">
- <Grid Loaded="LayoutRoot_Loaded" Width="200" Height="100">
- <Grid.RowDefinitions>
- <RowDefinition Height="50"/>
- <RowDefinition Height="50"/>
- </Grid.RowDefinitions>
- <Grid Grid.Row="0"><!--上の段-->
- <Grid.ColumnDefinitions>
- <ColumnDefinition Width="100"/>
- <ColumnDefinition Width="100"/>
- </Grid.ColumnDefinitions>
- <TextBox Name="textBox1" Grid.Column="0" Text="{Binding bind_string}"/>
- <TextBlock Grid.Column="1">
- <TextBlock.Text>
- <Binding ElementName="textBox1" Path="Text"/>
- </TextBlock.Text>
- </TextBlock>
- </Grid>
- <Grid Grid.Row="1"><!--下の段-->
- <Button Grid.Row="1" Content="{Binding bind_string}" Click="Button_Click"/>
- </Grid>
- </Grid>
- </Window>
バインドする変数はプロパティとして定義します。
この例では、Class1 に、bind_string と言う string型のプロパティを置きました。
class 宣言が public になっていません。これでも動作しましたが、Silverlight では、public 宣言は必須です。
いつ更新されるのかを観察するために、Debug.WriteLine() が入れてあります。
このプロパティが set されたら、PropertyChanged.Invoke() で、表示への通知が行われます。
#region 内は、INotifyPropertyChanged にカーソルを置いて、右ボタンメニューの「インタフェースの実装」で追加されたものです。
XAML では、bind_string を、TextBoxのText と ButtonのContent にバインドしています。
Button の Click イベントで、bind_string に値を代入しているので、Button をクリックすると、TextBox と Button の表示文字列が同じ内容に変わります。
XAML の記述で、bind_string は、どこから探されるのかですが、Grid など、親の DataContext です。
上位であれば良く、直上である必要はないようです。
Class1
- using System.ComponentModel;
- using System.Diagnostics;
- namespace WpfApplication2
- {
- class Class1 : INotifyPropertyChanged
- {
- string _bind_string="";
- public string bind_string
- {
- get { return _bind_string; }
- set
- {
- _bind_string = value;
- Debug.WriteLine(_bind_string);
- if (PropertyChanged != null)
- PropertyChanged.Invoke(this, new PropertyChangedEventArgs("bind_string"));
- }
- }
- #region INotifyPropertyChanged メンバ
- public event PropertyChangedEventHandler PropertyChanged;
- #endregion
- }
- }
ビハインドコードで、Class1のオブジェクトをDataContextに設定しました。
Button が Click されたら、bind_string に、文字 a を連結して代入するようにしました。
ビハインドコード
- using System.Windows;
- namespace WpfApplication2
- {
- public partial class Window1 : Window
- {
- public Window1()
- {
- InitializeComponent();
- }
- Class1 c1;
- private void LayoutRoot_Loaded(object sender, RoutedEventArgs e)
- {
- c1 = new Class1();
- this.DataContext = c1;
- }
- string _text = "";
- private void Button_Click(object sender, RoutedEventArgs e)
- {
- _text += "a";
- c1.bind_string = _text;
- }
- }
- }
DataContext を、Grid の Loaded イベントで設定しましたが、XAMLで設定することもできます。
DataContext をXAMLで設定する例
- <Window x:Class="WpfApplication2.Window1"
- xmlns="http://schemas.microsoft.com/winfx/2006/xaml/presentation"
- xmlns:x="http://schemas.microsoft.com/winfx/2006/xaml"
- xmlns:c0="clr-namespace:WpfApplication2"
- Title="Window1" Height="300" Width="300">
- <Grid Name="LayoutRoot" Width="200" Height="100">
- <Grid.DataContext>
- <c0:Class1/>
- </Grid.DataContext>
- <Grid.RowDefinitions>
- <RowDefinition Height="50"/>
この場合は、Loaded イベントの処理は不要になりますが、コードで Class1 のオブジェクトを作っていないので、変数の操作は不自由です。
- using System.Windows;
- namespace WpfApplication2
- {
- public partial class Window1 : Window
- {
- public Window1()
- {
- InitializeComponent();
- }
- string _text = "";
- private void Button_Click(object sender, RoutedEventArgs e)
- {
- _text += "a";
- ((Class1)LayoutRoot.DataContext).bind_string = _text;
- }
- }
- }
|
